My first ever blog post
Finally! After a year long intense planning and no action, I managed to finally setup my own blog from scratch, using Github pages. A simple question that everyone might ask is “why not write blogs on WordPress or Medium just like everyone else?”. Well, multiple reasons; it has bloated code that you can’t get rid-off, unnecessary targeted ads and more importantly, if you are a Developer, you are missing out all the fun!
 Scenario of a developer starting a blog
Did I convince you? OK, now let’s break down the humongous steps to setup your blogging site.
Step 1: Decide Your Theme
This step is to quickly browse through the various Jekyll themes available on various websites and pick one that fits your taste
Few sites where you can grab these templates:
- https://jekyllthemes.io/
- http://jekyllthemes.org/
- https://jekyll-themes.com/
- https://jamstackthemes.dev/ssg/jekyll/
I personally picked the Chirpy theme since it fits my expectations.
Step 2: Activate Github Pages
Once you pick the Jekyll theme, it’s time to host it on Github Pages. The theme you picked usually comes with a set of instructions to configure and the instruction varies between different themes.
I’ll try to explain briefly on how I setup the Chirpy theme. First, fork or clone it to your personal repo and then modify the _config.yaml. Push these changes to your github repository and you’ll find a new branch named gh-pages*, created by the CI for you.
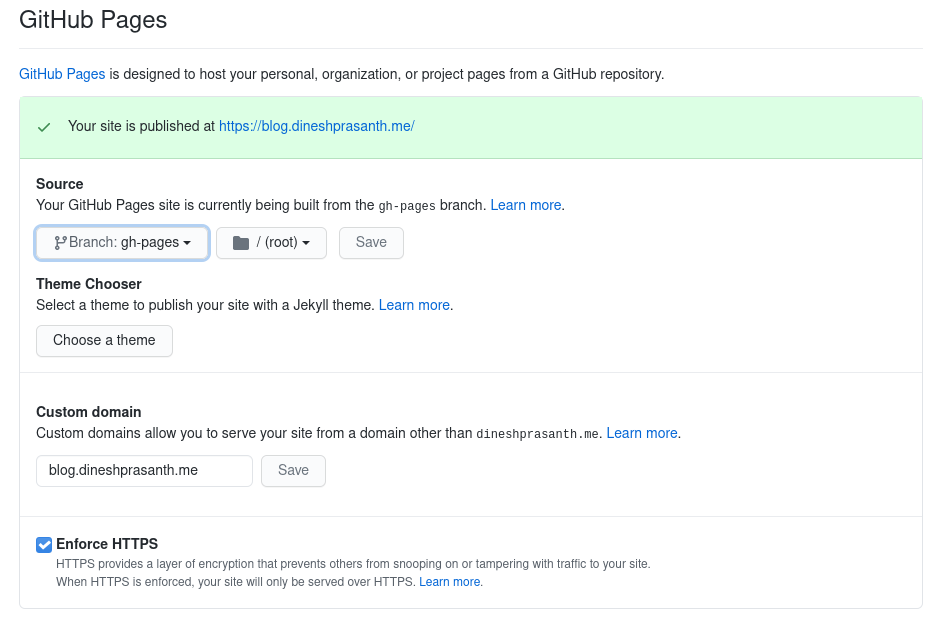
Next, activate the Github Pages by clicking on your repo Settings and scrolling down to the Github Pages section. Under Source select gh-pages and click Save.
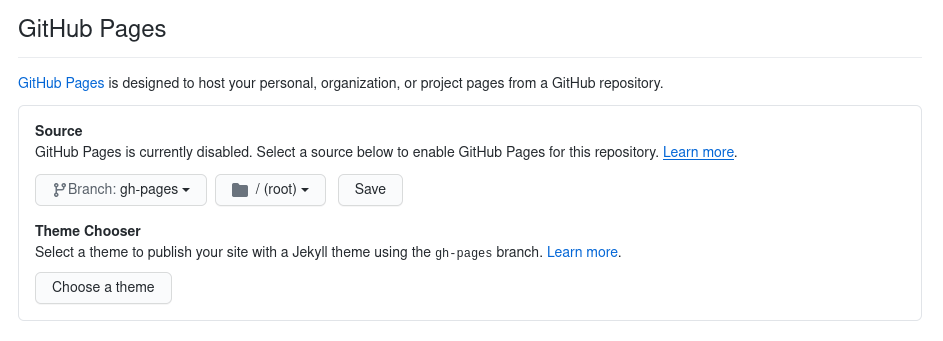
That’s it! Your blog is now published and can be accessed via https://your-gh-username.github.io/repo-name
* Make sure the Github Actions (or other CIs like Travis) is configured, since it is responsible to build your site and publish the content on gh-pages branch.
Step 3: Setup Your Custom Root Domain
You need to visit one of the domain name registrar to buy a custom domain. There are multiple registrars to choose from:
- https://www.godaddy.com/
- https://porkbun.com/
- https://domains.google/
- https://www.namecheap.com/ … and a thousand more
I personally use Porkbun since they are cheap and easy-to-use.
After you purchase your domain, go into your domain management portal, click on manage DNS and add A type DNS records for github pages.
| Record Type | Host | Answer |
|---|---|---|
| A | your-domain.com | 185.199.108.153 |
| A | your-domain.com | 185.199.109.153 |
| A | your-domain.com | 185.199.110.153 |
| A | your-domain.com | 185.199.111.153 |
(These A type DNS records map your domain name to the Github’s IP address)
OH! Make sure to add an ALIAS type record to point www.your-domain.com to your-domain.com
So far, my DNS record looks like this:
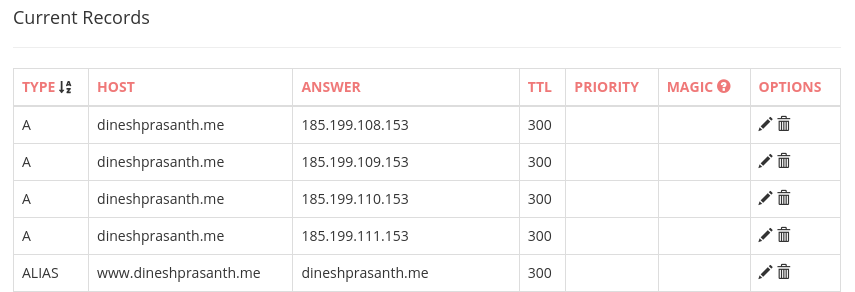 My DNS records with Root Domain Configured
Now that you have your domain’s DNS setup, you have 2 options:
- Use the root domain to host your blog (Example: https://your-domain.com)
- Create a sub-domain to host your blog (Example: https://blog.your-domain.com)
Use Root Domain To Serve Your Blog
Head to your Github repository, click on Settings → Github Pages → Custom Domain and enter your domain.
This creates and commits a CNAME file, with your domain name as content, in the root dir of your repo.
Your website should now be served via https://your-domain.com
Use Sub-Domain To Serve Your Blog
Head to your domain registrar and go to your domain’s DNS settings. Add a new CNAME record that maps your your-sub-domain.your-domain.com to your-gh-username.github.io
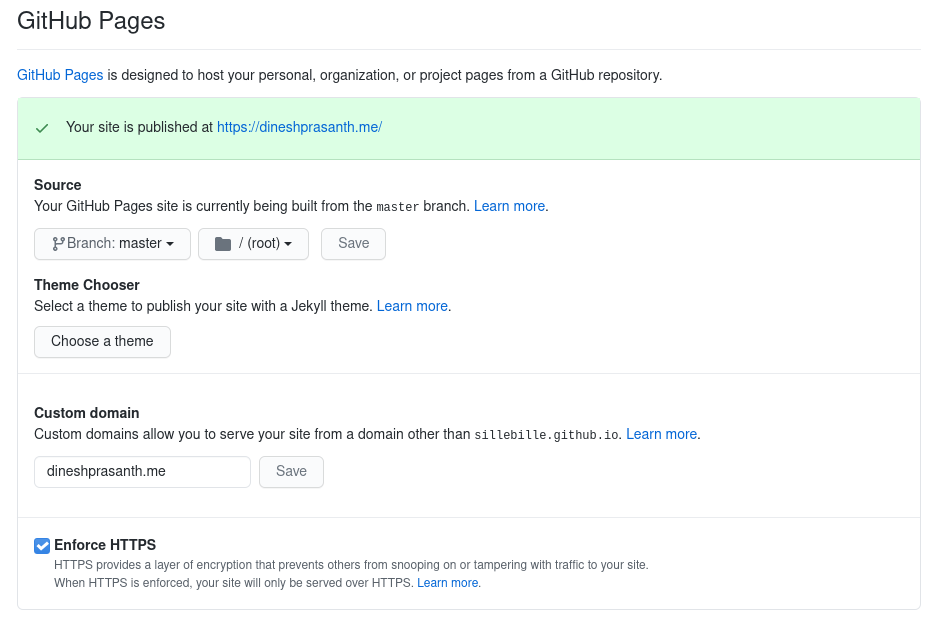
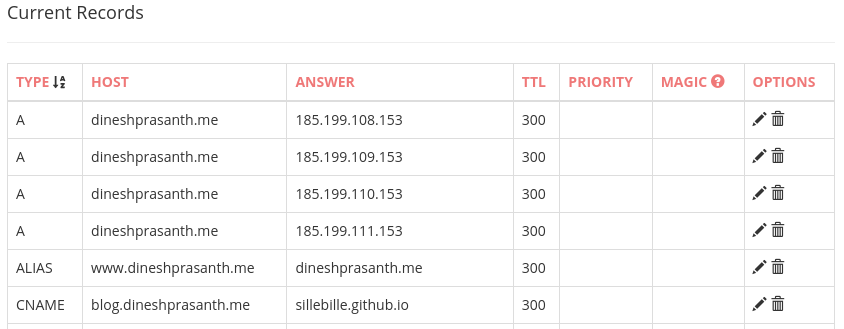 My Complete DNS Configuration
Now, visit your Github repo and go to Settings → Github Pages → Custom Domain and enter your sub-domain.
This creates and commits a CNAME file, with your domain name as content, in the root dir of your repo.
Best Practice : Click on Enforce HTTPS to serve your blog via secure SSL connection. Your site will be configured with a free SSL certificate from Let’s Encrypt. Note that if you choose not to enable this for some reason, your site will not be served in future if a strict policy is implemented by browsers.
Bonus Tip: Test Your Site
If you see a 404 error or Domain Not Found error your DNS record might not be updated. Every time you update a DNS record, it takes few mins to several hours to propagate the WWW. So, give it sometime. To see if your domain is reachable, you could dig the DNS:
1
2
$ dig YOUR-DOMAIN.COM +noall +answer
$ dig YOUR-SUB-DOMAIN.YOUR-DOMAIN.COM +noall +answer
Here is a reference from digging my website:
1
2
3
4
5
6
7
8
9
10
11
12
$ dig DINESHPRASANTH.ME +noall +answer
DINESHPRASANTH.ME.	96	IN	A	185.199.110.153
DINESHPRASANTH.ME.	96	IN	A	185.199.111.153
DINESHPRASANTH.ME.	96	IN	A	185.199.109.153
DINESHPRASANTH.ME.	96	IN	A	185.199.108.153

$ dig BLOG.DINESHPRASANTH.ME +noall +answer
BLOG.DINESHPRASANTH.ME.	129	IN	CNAME	sillebille.github.io.
sillebille.github.io.	3429	IN	A	185.199.111.153
sillebille.github.io.	3429	IN	A	185.199.110.153
sillebille.github.io.	3429	IN	A	185.199.109.153
sillebille.github.io.	3429	IN	A	185.199.108.153
Hope you found this article useful. Please stay tuned while I try to improve my blog. Next, I’m working on adding a comments section, and I’ll be writing a separate article on how to set it up.